49.895851
-97.055691
Happy Birthday – 1 Year Old Today
Well, it’s been an interesting year. It was a year ago today that I started this blog with the birth of The Drunken Crow, Tales of Adventure in Dual Sport Motorcycles. Oddly enough, I find myself sitting in the same small northern Ontario town that I was in on this day last year. Crazy coincidence? I’m not sure, what are the odds are but, like this town, very remote.
I’m in this small town for work, which lately has had me travelling all over Canada. It’s been great to see parts of Canada that I would not have otherwise seen. I’ve been to Vancouver and Kamloops, BC, Edmonton and Winnipeg a few times each as well as Saskatoon and Regina/Melville. I’ve even had a chance to got back to the Maritimes and visit my folks with a work related trip to Moncton, NB. But the negative side is that I’ve had less time to provide to this blog. But I do try to keep my Instagram active, which a feed shows in the blog pages. But worse still is the lack of time I am able to spend with my family. Most trips take me away for a week at a time and sometimes, just home long enough to change out the suitcase and go again.
If you’ve been following my blog or mostly Instagram, you’ll notice I did get my 2013 F800GS bike back in March and was able to do a road trip from Ontario to Nova Scotia and back with a friend who took his 1986 K100RS BMW. Lots of different weather conditions, some good, some not so comfortable. I learned lots for the next trip. Where will the next rip be?…not sure, I haven’t had much time to think about it.
The last few months have been a little rough; my wife had lost her job and was without work for almost 4 months. She just started a new job a couple of weeks ago. Like most people, we live paycheque to paycheque, so this was a though time. We ended up selling a bunch of personal items to make it though. The one I’m saddest about was my DSLR camera, a Canon 40D with a few nice “L” lenses. We were to the point I was going to have to consider selling the F800. Likely I would have parted with my riding gear first and than the bikes as the last resort. Yes bikes, I bought my wife a 2013 Honda CBR 250R shortly after getting mine.
Now that my wife is back to work, I can consider my options with my job. Being away from my family so much is not what I signed up for. For now I’m sticking with the current job, but at the same time looking into other possibilities. One such idea, is my photography. I sold my camera and lenses to help us out, but sometime soon I’m getting a new camera and I think this time I will move back to a Pentax, the K-3 to be precise and some DA* lenses. This current job has provided a lot for me but taken as much back, like the time I used to be very involved with photography. I want to take that back and possibly turn that into a career, part-time if nothing else.
As for my motorcycle plans for the new year, nothing concrete. I noticed that Alt-Rider same top bars as an addition for their side crash bars coming out in the soon. Those would be nice. Also, I’d like to add a top case to the rear of the bike to match the side cases (Jesse). I found that the Klim Badlands Pro jacket can be hot at times. In part because of the lack of airflow up the sleeves. I found a product called Ventz, that may fix this issue. They are not expensive ($30) and are available at my local store. I’m sure I’ll see these under the tree in a couple of weeks.
My 50/50 Mitas tires made out very well on the 4,000km paved road trip and still have lots of tread to keep me going this 2014 summer. So no new tires required. I did my own oil change in the spring and against the advice of my dealer used synthetic oil, nothing about that in the manual. I plan to change the oil again in the spring and again use the synthetic oil. I did notice on the last wash of the bike, before I put it away for the year, a bolt of the front fender was missing. I will have to purchase a new one and check all the other bolts before hitting the road again. I put just over 8,000km on during this first season and I think the next scheduled maintenance is at 10,000km. I may have the dealer do the maintenance early for the2014 riding season. Which will start for me as soon as the ice/snow are clear off the road and the temperature stays near or above 0C. Some of the trails I use will still have snow in them, but that will part of the fun this year. We’ll see how my spare time makes out next year.
If you’ve been following my blog or Twitter or Instagram or any other social media that I am on I would like to thank you. I only have a few (13) followers of this blog, but have 35 followers on Twitter (not very much, I know) and a few more on Tumblr (101), thank you. But on Instagram I have almost 400 followers, a special thanks to you.
Thanks to you all. I hope you all have a Merry Christmas and Happy Holidays or whichever greeting applies to you, and in any case I wish you all the best in the new year. I’ve meet some great new people in the dual sport world this past year and I hope to see you again and meet even more new people. Don’t be shy about letting me know you’re in my area, maybe we can ride together.
Cheers,
The Drunken Crow
Appologies
I apologize for not keeping up with updating the blog. Life and work have been somewhat crazy. Mostly I’ve been posting photos on Instagram. Big changes are in the wind for me and my family. When that’s all completed and over with in the next couple of months I will fill you in and hopefully have time to continue manning the blog.
Until than,
Cheers
The Drunken Crow
Road Trip 2013 – Toronto to Nova Scotia
The Trip
If you’ve been following this blog than you know the plan, drive my 2013 F800GS from Toronto to Nova Scotia and back. But there’s a little more to it then that. This is my summer vacation, I have a scheduled week off plus I took some additional days so I’d have lots of time for the trip. The real purpose of this trip is to visit my parents in NS, where I grew up. I moved to Ontario about 12 years ago. My wife also has vacation, but she will be flying to NS with our daughter and meeting us there. Also, my friend, who I convinced to buy a motorcycle will be joining me on the trip. He bought a 1986 BMW K100RS with 60,000km on it. I was a bit concerned that maybe he’d have issues with an old bike on a long trip. Before we left he had done a number of drives to work out any kinks, which turned out to be an electrical problem, causing the bike to run on only two of the four cylinders. He fixed that problem and changed all the fluids and the tires. In the end, his bike, and mine had no issues on the entire trip.
The Route

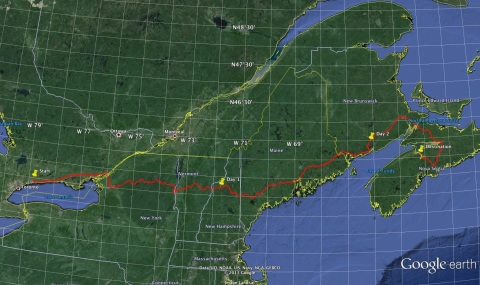
The route i picked east to Nova Scotia, was because I have never been to the US before and wanted a more scenic route than the beautiful but “highway boring” route that we would take home. I had decided early on the route I wanted to go though The Adirondack Mountains in NY state as well as White Mountain in NH. With the route taking non-interstates, the speed would be slower and require three days. I was hoping for two days, but that wasn’t going to happen. You can see on the map the end of day stops indicted by the yellow pins.
The return trip route, I have done before in a car and knew it was possible in two days, but could we do it on a bike.
Neither me nor my friend had ever done a ride this long, usually it was ride for a few hours at most. I did a day long trip fully loaded with gear just to see how I made out and thought this trip was totally within my limits.
Note: The red line on the maps is the actual route tracked by the GPS.
I had my bike packed, fuelled and ready to go the night before. My friend, was to show up at 6am and we would depart shortly after him arriving. I was a little slow getting around, which was just as well, as my friend was late, he finally arrived at 6:30. He then informed me, he had lost his wallet the night before and had no driver’s licence on him. Luckily, he had not lost his passport and getting into the US would not be an issue. However, we would need to stop on-route so he could get a temporary licence for the trip. We adjusted our 1st planned fuel stop earlier and also got him is temp licence. This cost us about an hours worth of time.
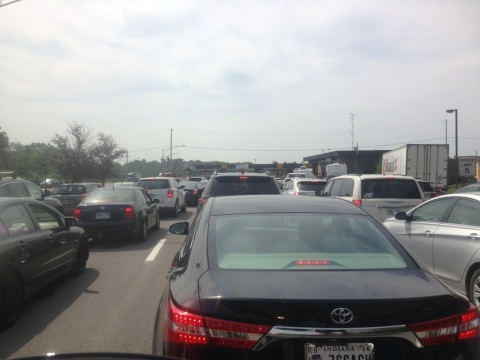
The day was already warm, and proceeded to get hotter, by the time we got to the border crossing it was 25C and it made the 40minutes to cross, rather warm in full gear, edging our bike closer to the border agent. Other than the lines, there were no hold ups for us at the border and we were on our way. The temps hit a high of 33C and didn’t go below 30C until the sun went down.
I missed on of the exits on my planned route and got stuck on an interstate longer than I wanted, but the GPS reroute and the rest of the trip was uneventful. We arrived at our hotel at 7:30pm and had covered 672km in 12 hours 42 minutes with 4 stops for fuel and I stop for a drivers licence.
The next day called for rain all day.
Border crossing line to get into the US.
East – Day 2 (567km – 11h5m)

When we awoke the next morning it had been raining overnight and the ground was wet with puddles in the parking lot of the hotel. The rain stopped long enough to let us get the bikes repacked.
But the one thing that stood out from yesterday’s ride was not the heat. It was how bad the stock F800GS seat is. That things is uncomfortable for np any ride more than a couple hours ride where you can’t stand up, like you can off road. There were not many options for me on the second day to fix this. But I didn’t have two pieces of foam from computer packaging. I used the gorilla tape to secure one piece of foam to the back part of my seat. This helped some and did last the entire trip. But any future trip will see me with a proper seat pad like an AirHawk.
We got on the road by 8:00am and the mist quickly changed to rain. I’d do the trip again, but driving 11 hours in rain, mist and downpours is not that fun. My gloves quickly become soaked and my hands were all pruned. I even started to get worried that with being water logged for so long the skin would start to blister and crack. We made a pit stop at a hardware store and wanted to buy any type of waterproof glove but no such luck. A did buy a pair to have something dry and hoped that would last slightly longer than my Handroid gloves. But this pair didn’t last much longer but finally made it too the US/New Brunswick border back into Canada. At this point I dug out a pair of mechanic’s gloves I had in my tools and put rubber gloves over them, this helped my hands from getting wetting but they were already soaked and pruned and the skin was white from being waterlogged for so long.
By the time we reached my cousin’s house in NB, I was soaked through and cold. I don’t think I could have gone any further than the 567km without getting hypothermia. I did have on the Klim Badlands Pro jacket and pants, but I think after 11 hours of driving in the rain, was more than any waterproofing could give.
We were able to put all our gear in the dryer and sleep in the nice warm and dry RV Camper. Imagine, I brought my tent, which was stacked too. My plan was to sleep in their yard. Yeah, right.
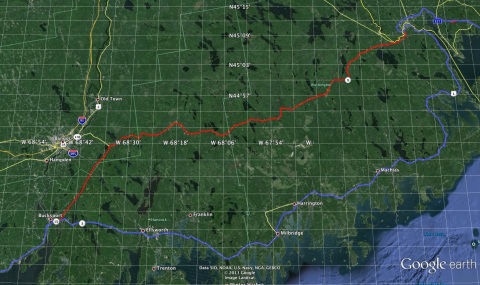
Because of being cold and wet, we deviated from my planned route along the coast of Maine. See the map below. The red line is the route taken and the blue line was the intended route. This saved us about an hour and I had prep landed the “shortcut” for a situation like this.
East – Day 3 (609km – 4h50m)

It rained pretty hard all night and into the morning. We heard that the area of Vermont near Lake Champlain has flooded behind us. We were lucky to get through when we did as some of the roads we had travelled over we’re closed.
We were slow getting around and my cousin’s daughter insisted on making us homemade pancakes. Who could say no to that. Most the trip as gas station snacks while refuelling and a dinner at night in a local restaurant. By 9:00am we were in the road.
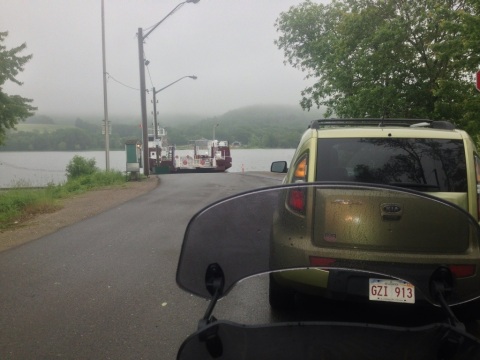
A short ways away is the ferry crossing, it was that or back trxpack the way we came and lose up 30-40 minutes. The ferry would cross when they saw people on the other side and we didn’t wait more than a few minutes.
The woman running the ferry talked with us and warned that we were not going to get far as some of the small towns we were to be driving through we’re holding their Canada Day parade today (Saturday) and it would be started by the time we got there. At first it looked like she was mistaken and the parade had not started but eventually we got stopped by the RCMP as they led the parade through the small town. Luckily is was a small parade and we were only stopped for about 20 minutes.
We got lucky and the rain held off and after an hour or two it started to clear. We stopped on the IDE of the highway and removed some of our rain gear and I open my jacket vents. It was mostly a windy day and at time was fighting the wind on the highway. One leg was bad with the gusty head wind and we made an unplanned early fuel stop and drive the last 45 minutes on back roads a little more sheltered from the wind. We arrived at my parents place just under five hours from when we started that morning and covered 609km.
Over the three days it took us 29 hours to cover the 1848km across three provinces and four States. My ass was sore and we were both hungry. Now time to relax for the five days, maybe do some local riding, drink and eat lobster. And then turn around the complete the drive back to Toronto, this time all highway driving and only taking two days. Would it rain the whole way back? You’ll have to read the next few posts to find out.
Cheers,
The Drunken Crow
Road Trip – Toronto –> Nova Scotia 2013
Day 0 – a little day before test packing on the bike. Tomorrow, depart in a 1900km one way road trip to Nova Scotia. Route will take us through NY, VT, NH and ME, United States before entering back into Canada through New Brunswick. I’m taking my F800GS and my friend is taking his ’86 K100RS. It should take us about 2.5 days to reach our destination, while there visiting with family and old friends. Return trip, 5 days later should only take 2 days and will stay within Canada, following the Saint Lawrence River through Montreal back home. Current forecast say we’ll get wet on Friday. Glad I’ve got the Klim gear. The first day takes us through Lake Placid, NY and than a few more hours east to a night in a hotel. Hopefully, haven’t booked anything. This is the longest leg and will take the most amount of time. The second night we’re camping out in a relative backyard with the tent attached to the bike. The third day is only a half day with 5 hours or less or driving to destination. Should lots of fun with a few rails to tell when it’s all finished.
Please follow my Instagram or Twitter account for the most current info about the trip. I’ll blog about it once I return.
Cheers,
The Drunken Crow
BMW F800GS/F700GS 2011-2013 Recall in Canada
On certain motorcycles, the side stand ignition cut-off switch could loosen and become damaged. As a result, the side stand switch would fail to turn OFF the engine if the side stand is extended while a drive gear is engaged. If the motorcycle is ridden with the side stand in the down position, the stand could hit the ground during a turn, which could result in a loss of vehicle control and a crash causing property damage and/or personal injury. Correction: Dealers will install bolts to securely fasten the side stand switch (originally held by a circlip).
Review – Sidi Crossfire2 SRS Boots
Sidi Crossfire2 SRS Boots
I put a fair bit of thought into which boots I was going to put my feet into. And a fair bit of money. I tried on a number of boots in a few different stores, including and Alpinestars, Thor, BMW and Fox. The BMW came a close second for comfort. The others just didn’t fell right on my foot. When I started looking the Sidi Crossfire kept coming up as a high quality, comfortable from the start and very protective boot. Also around the same time the Crossfire2 boot had been announced and was available a a few location but hard to come by. I tried on a pair of Crossfire non-SRS boots called the TA and loved them. I ended up waiting until I could get the second version, but jumped at the chance to get a pair right away and could only get the white colour. I would have preferred the grey ones with high-viz yellow or even black.
The boots were expensive, $675 when I purchased them near the end of February 2013, a quick check of the same location show the boots now (June 2013) sell for $599, about $75 less, but still expensive. However, I wanted an ultra protective boot and everything pointed at the Sidi. They arrived a few days after ordering. What a great looking boot. My wife teased me I looked like a Storm Trooper, but under neath my riding pant you barely notice the striking white boots.
Besides I the white colour the first thing you will likely notice about eh boot is the squeaking noise they make as you walk around. This was a complaint I saw quite frequently when researching the boots, it still holds true. Although, since I’ve been wearing the boots on a few rides and they have become dirty and covered in dust and mud, I think the squeak has lessened. Still noticeable while inside walking around but not so much outside.
The SRS version of the boot has user replaceable soles, thus the SRS (Sole Replacement System). The TA version of the boot while cheaper can only have the sole replaced by a show repair store as the soles are sown on. With the other all cost of the boot it made since to be able to replace the sole when I needed, easily, myself. Also, the boots come with the standard sole with no rear tread on it. You can buy a Enduro MX sole which I ordered from my local shop right away for $40. At the time the soles were hard to come buy and it took months for my shop to get them in. They arrived a few weeks ago. You can also order racing soles.
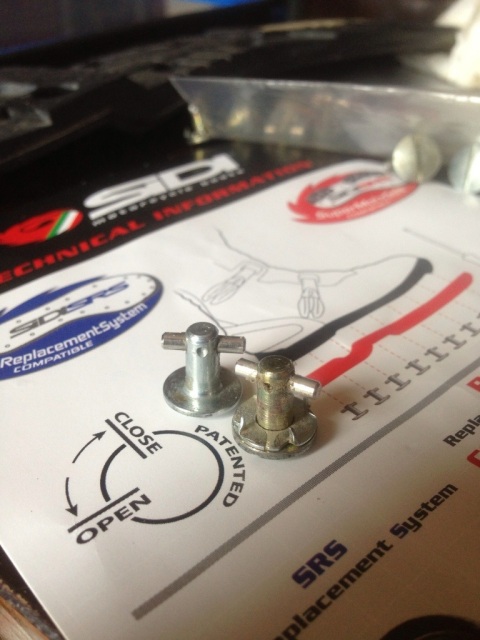
Changing the soles over takes a fair bit of time as there are 17 quarter-turn screws holding each sole to the boot. The basic soles work very well on the pavement and surprisingly well in the dirt and mud, but I changed them over to the MX soles as soon as they arrived. The original soles will be my backup. You don’t want to wear the sole so that the screws start to get warn as you may then have issues removing them. Besides the traction the soles add to the boots they also do two other small things. They add a tiny bit of lift to the boot as they are slightly thick than the original sole. This helps me on the tall F800GS. Also, with the sole being slightly thicker it is more stiff, adding a bit more rigidity to the foot.
Below are some picture of the change over to the new sole from the old.
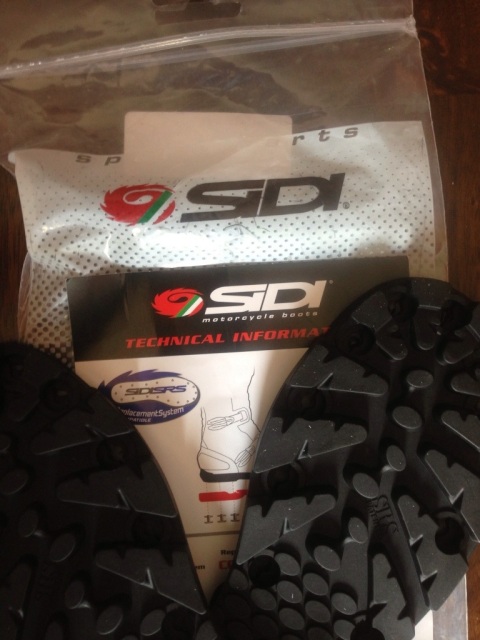
the soles come in a standard plastic bag with instructions and product card
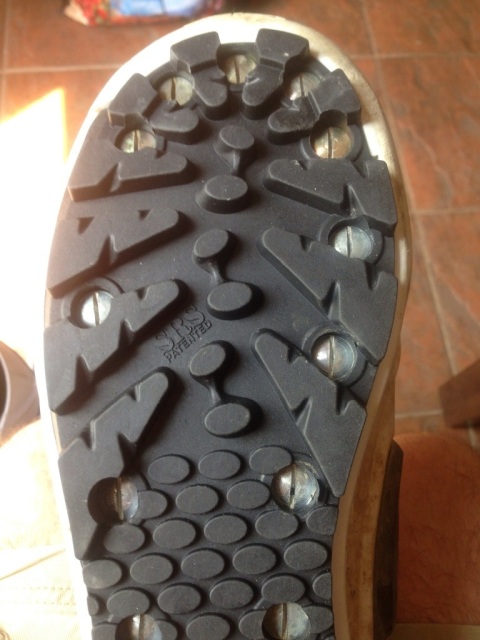
the original standard sole on the boot. Notice the quarter-turn screws and the direction on which way to turn them. Also notice the wear on the sole from my PivotPegz III

this is the boot with no sole installed

these are the two different screws for the sole. The one with little spikes goes in the toe
the boot with the MX sole installed
Like I said adding the MX sole to the boots adds a slight amount of stiffness and height to the boot. But let’s talk about comfort and waterproofness.
waterproof?
First off Sidi makes no claims that the boot is waterproof. But the liner does have a gator built in which helps to keep and dirt out. I have yet to step into any major puddle or the bathtub to really test this out. But stepping into a small puddle or spaying off your boots with a water hose while wearing waterproof riding pants keeps your feet dry. The deepest puddle to date came just about ankle deep covering my entire top of the foot. Riding in the rain my foot also stayed dry, again while under a waterproof pant (Klim Badlands Pro). I do plan to step into a larger puddle or even the bath tub to test out just how waterproof these boots are, but have not done so yet.
comfort
The longest I’ve worn the boots for is about 10 hours straight. I did a day long ride on some back roads about 400km worth and upon returning home, I felt no need to get out of the boots and continued to wear them for a while before taking them off. The are comfortable right out of the box and seemingly more comfortable each time I wear them. As they break in the are even more comfortable to walk in. I’m not sure I’d want to go hiking in them or spend the day at the mall, but I would walk to check out a trail or take a quick trip to the mall and still wear them on my bike. I even gone so far as to drive in them. The automatic SUV posed no problems at all even more trip of 15mins or so. Even in my car with a standard transmission I’ve worn these boots and managed fine but I don’t think I’d want to wear than too far and need to shift gears a lot.
Stairs are only slightly tricky but nothing you can’t do, maybe not the CN Tower Climb but you can certainly go up a flight of stairs to retrieve something you forgot and not have to take them off.
I recently removed my knee pads from my Klim Badlands Pro pants. In part because I couldn’t get them to stay in place over my knee and I also thought I wanted something a little bigger in protection. In replacement I bought the Fox Titan Pro Knee Guard, $80. Anyway, the point is that I can easily wear these over my socks, in my boots and under my pants. The Crossfire boots are adjustable to allow the use of knee guards or even a knee brace. The straps on the boots are quick and easy to adjust, the boot and be taken apart and reassembled to allow a even bigger calf. Also the buckles are easy to open and close with gloves on and stay securely closed.
fox in socks?
I did buy a pair of Klim Socks, the basic ones, $28 CAD. The socks were longer than the boots but I found them pretty warm and they didn’t seem like the keep my foot all that dry due to sweating. I tried regular cotton socks but found the they didn’t work well either. Bad cotton. Recently I’ve switched my regular day sock with ones made synthetic materials, not cotton. Sorry I don’t have the label here. They work great in my other footwear including the Crossfire boots. Now these are regular mid calf length socks, but MX length socks so what I noticed the first couple of times wear them in my boots is the elevator cuff around the top of the boot would chafe on my hairy legs. After a few times I don’t notice it anymore and will likely keep wearing the same sock rather than paying for MX socks.
If it turns out the boots need to be more waterproof than I might try the Klim Gore-Tex waterproof socks, pricey but worth it to keep your feet dry, but so far no need.
I did also buy a pair of ICON Patrol waterproof boots, just over $100 I think. They too are pretty comfortable and I’ve worn them out in my car instead of changing to something else. They are nice boots but I don’t fell as secure in them. Any long riding or trips off-road and I put my Crossfires on.
The boots should last a long time and you can Oder replacement parts for things that break on them or need replacing, so I don’t except to be getting a new pair of MX boots anytime soon. This was also part of the justify the large cost of the boots, long term investment.
Anyway, I really love the boots and highly recommend them. Sizing charts were true but I was also able to try on a couple of different Sidi boots to ensure the correct size. If you can’t try them on first purchase from a place which will allow you to at least exchange for the correct size. You won’t be disappointed.
For other reviews of the Sidi Crossfire2 boots check theses sites:
Motorcycle USA
or
Revzilla (with video)
Cheers,
The Drunken Crow
The Better To See You With
One the of first accessories I put on my bike was LED spot lights. I chose the Rigid Dually LED lights. But mounting lights on the 2013 F800GS is a bit tricky due to the lack of mounting points and lack of room on the bike. Depending on the light kit you bought you might be fine, but needed somewhere to mount them.
The place I bought the lights suggested I mount them to the main headlight bracket and sold me two small pieces of metal with a hole at each end allowing one bolt to attach to the LED light and the other to the main headlight bolt. You can’t see the attachment in the picture below, but what you can notice is that the actual LED lights block the view of the turn signals. It only took me a couple trips of travelling through a four-way stop to realize that people couldn’t tell I was signalling.

I looked at a couple of options, the first two were not cheap. One was to replace the signal light bulb with LED inserts. This would make them much brighter and more easy to see. But they would still be hidden behind the spot lights. A priced this option at a few places and the cost was around $200. Not something I want to send on that yet, maybe someday.
The other option was to buy and wire yellow LED strips to either the Barkbuster Hand guards or the front forks. This was cheaper option, below $100 plus shipping. But still, I’d rather spend the money on something different.
I looked at mounting brackets specifically sold for the F800GS, but they were over $100 and didn’t really change the position of the LED lights.
It was until I was watching a bike video on YouTube, Motoriley, a member of the Awesome Players Off Road Motorcycle Club. I like watching his videos, informative, funny and entertaining. Anyway, I noticed while watching one of his videos that his F800GS had the turn signals in a different location. Now, I’m not sure if that’s an actual design difference between the different years of the bike or if he moved them himself. But that got me thinking. Could I move things around myself? Turns out you can.
The picture below shows better the original location and the bracket used to connect to the main headlights. Also the original location of the turn signal.

The plan, relocate the turn signal and move the LED lights off the headlight mount. A little drilling though the bike’s plastic is in order. The easiest was to move was the LED lights, I moved them to the old location of the turn signals, already holes there, didn’t need to drill. I went to the hardware store, bought a couple of bolts, washers, nuts for spacers and nylon lock nuts to secure it. A return trip for longer bots and done.
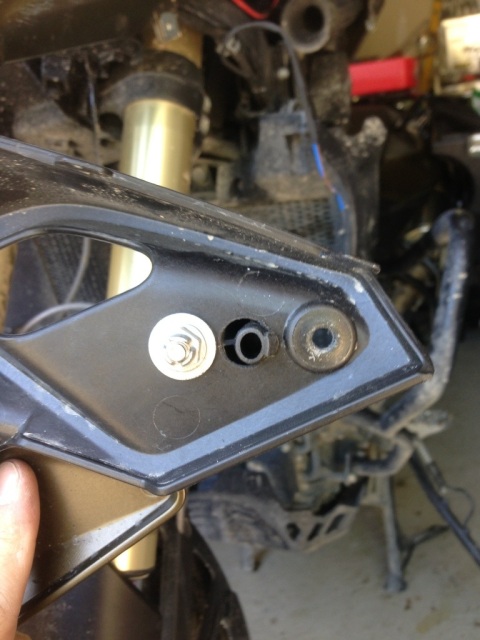
But where to put the turn signal lights? The connecting wire allows for some freedom of location but not too far. The picture below shows the side fairing piece I drilled through. The far left hole is the fairing mount screw hole, the other two holes I drilled myself. One hole to mount the light and the other for the wire.

In this picture you can see the rubber mount of the turn signal installed.
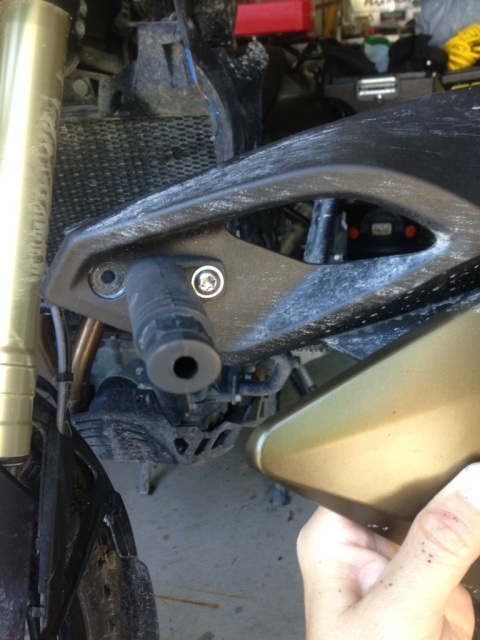
Here is a photo of the back side of the fairing with the signal light mount.
Here are two pictures which show the new mounting locations and the headlight mount for reference.

And lastly, here is a picture show the new location of the lights on the right and the old original locations on the left.

Notice you can’t even see the turn signal on the left.
I did end up with a slight problem with the location of the LED lights. The way I mounted and the weight of the lights caused them to vibrate up and down. They basically bounced with bumps. I wasn’t too concerned about short term structural integrity but I wasn’t sure about long term. Also, I wasn’t sure how distracting the bouching light was going to be to oncoming drivers. They would definitely notice me. After a quick change in the mount and lowering the light just slightly to rest on the fairing, the bounce is gone. This change is not shown in the pictures but when I get a chance I’ll upload the newer picture.
Update: two new pictures showing mount of LED lights
This is the inside view. Notice the black spacer. This is actually the adapter mount used to mount the LED lights to the headlights. Now used as a spacer and support.
View of the mount from the outside. Nuts and washers used as spacers.
Overall the whole job took a few hours. I just took my time and thought things through. The signal lights mounted with the original hardware, I just had to drill new holes to copy the old ones. The bolts, washers and nuts for the LED mounting cost about $10 from the hardware store. I used metric nuts/bolts to match the other metric hardware on the bike to avoid carrying different wrenches in my kit. Besides, everyone uses metric now right?
Drilling holes in their bike isn’t for everyone. Make sure you know what you’re doing before you start or go with a different option if you’re not. In the end I was very pleased with my DIY light relocation. And I saved a few bucks in the process.
Cheers,
The Drunken Crow<

